Individual training
Training sessions are the main feature of Rook Training SDK they notify realtime info of heart rate, effort zones, calories and steps (only on RookMotions sensors).
In this tutorial you will learn how to use the RMTrainer class.
Contents
Coding the UI
This section covers 2 activities:
- TrainingSoloActivity - Will display training measurements.
- TrainingTypeActivity - After selecting a training type will navigate to TrainingSoloActivity.
The file structure should look like below:
your.package.name/
    |-- ui/
        |-- trainingtype/
            |-- TrainingTypeActivity
        |-- training/
            |-- solo/
                |-- TrainingSoloActivity
            |-- TrainingKeys
Create resources.
On res/values/styles add back button styles
<?xml version="1.0" encoding="utf-8"?>
<resources>

    <style name="Widget.RookMotion.Button.Back" parent="Widget.MaterialComponents.Button.TextButton">
        <item name="android:text">@string/back</item>
        <item name="android:textColor">@color/black</item>
        <item name="icon">@drawable/ic_arrow_back</item>
        <item name="iconTint">@color/black</item>
        <item name="rippleColor">@color/black_50</item>
        <item name="android:insetTop">0dp</item>
        <item name="android:insetBottom">0dp</item>
    </style>

    <style name="Widget.RookMotion.Button.Back.White">
        <item name="android:textColor">@color/white</item>
        <item name="iconTint">@color/white</item>
        <item name="rippleColor">@color/white_50</item>
    </style>

    <string name="back">Back</string>
</resources>
On res/values/colors add zone and button colors
<?xml version="1.0" encoding="utf-8"?>
<resources>
    <!-- Your app colors -->

    <color name="black">#FF000000</color>
    <color name="black_50">#50000000</color>
    <color name="white">#FFFFFFFF</color>
    <color name="white_50">#50FFFFFF</color>

    <color name="zone_0">#FF000000</color>
    <color name="zone_1">#FFA2A2A2</color>
    <color name="zone_2">#FF0091EA</color>
    <color name="zone_3">#FF00C853</color>
    <color name="zone_4">#FFFFAB00</color>
    <color name="zone_5">#FFD50000</color>
</resources>
Create the UI for each activity.
The activity_training_solo.xml file will show the measurements and play/pause/stop buttons
<?xml version="1.0" encoding="utf-8"?>
<ScrollView xmlns:android="http://schemas.android.com/apk/res/android"
            xmlns:app="http://schemas.android.com/apk/res-auto"
            xmlns:tools="http://schemas.android.com/tools"
            android:layout_width="match_parent"
            android:layout_height="match_parent"
            android:fillViewport="true"
            tools:context=".ui.training.solo.TrainingSoloActivity">

    <LinearLayout
            android:id="@+id/base"
            android:layout_width="match_parent"
            android:layout_height="wrap_content"
            android:background="@color/zone_0"
            android:orientation="vertical"
            android:padding="20dp">

        <com.google.android.material.button.MaterialButton
                android:id="@+id/back"
                style="@style/Widget.RookMotion.Button.Back.White"
                android:layout_width="wrap_content"
                android:layout_height="wrap_content"/>

        <LinearLayout
                android:id="@+id/choose_sensor"
                android:layout_width="match_parent"
                android:layout_height="wrap_content"
                android:layout_marginBottom="10dp"
                android:gravity="center_vertical"
                android:orientation="horizontal"
                android:padding="10dp">

            <ImageView
                    android:id="@+id/sensor_state"
                    android:layout_width="25dp"
                    android:layout_height="25dp"
                    android:contentDescription="@null"
                    android:src="@drawable/ic_sensor_off"
                    app:tint="@color/white"/>

            <TextView
                    android:id="@+id/sensor_name"
                    android:layout_width="0dp"
                    android:layout_height="wrap_content"
                    android:layout_marginHorizontal="10dp"
                    android:layout_weight="1"
                    android:text="@string/choose_a_sensor"
                    android:textAllCaps="true"
                    android:textAppearance="@style/TextAppearance.MaterialComponents.Body1"
                    android:textColor="@color/white"/>

            <ImageView
                    android:layout_width="25dp"
                    android:layout_height="25dp"
                    android:contentDescription="@null"
                    android:src="@drawable/ic_arrow_forward"
                    app:tint="@color/white"/>
        </LinearLayout>

        <LinearLayout
                android:layout_width="match_parent"
                android:layout_height="wrap_content"
                android:layout_marginBottom="10dp"
                android:gravity="center_vertical"
                android:orientation="horizontal"
                android:padding="10dp">

            <ImageView
                    android:id="@+id/training_type_icon"
                    android:layout_width="25dp"
                    android:layout_height="25dp"
                    android:contentDescription="@null"
                    android:src="@drawable/ic_training_type"
                    app:tint="@color/white"/>

            <TextView
                    android:id="@+id/training_type"
                    android:layout_width="0dp"
                    android:layout_height="wrap_content"
                    android:layout_marginHorizontal="10dp"
                    android:layout_weight="1"
                    android:text="@string/training_type"
                    android:textAllCaps="true"
                    android:textAppearance="@style/TextAppearance.MaterialComponents.Body1"
                    android:textColor="@color/white"/>
        </LinearLayout>

        <TextView
                android:layout_width="match_parent"
                android:layout_height="wrap_content"
                android:text="@string/time"
                android:textAlignment="center"
                android:textAllCaps="true"
                android:textAppearance="@style/TextAppearance.MaterialComponents.Headline6"
                android:textColor="@color/white"/>

        <TextView
                android:id="@+id/duration"
                android:layout_width="match_parent"
                android:layout_height="wrap_content"
                android:layout_marginBottom="10dp"
                android:text="00:00:00"
                android:textAlignment="center"
                android:textAppearance="@style/TextAppearance.MaterialComponents.Subtitle1"
                android:textColor="@color/white"
                android:textSize="18sp"
                android:textStyle="bold"/>

        <TextView
                android:layout_width="match_parent"
                android:layout_height="wrap_content"
                android:text="@string/heart_rate"
                android:textAlignment="center"
                android:textAppearance="@style/TextAppearance.MaterialComponents.Headline6"
                android:textColor="@color/white"/>

        <TextView
                android:id="@+id/heart_rate"
                android:layout_width="match_parent"
                android:layout_height="wrap_content"
                android:layout_marginBottom="10dp"
                android:textAlignment="center"
                android:textAppearance="@style/TextAppearance.MaterialComponents.Subtitle1"
                android:textColor="@color/white"
                android:textSize="18sp"
                tools:text="150"/>

        <TextView
                android:layout_width="match_parent"
                android:layout_height="wrap_content"
                android:text="@string/calories"
                android:textAlignment="center"
                android:textAppearance="@style/TextAppearance.MaterialComponents.Headline6"
                android:textColor="@color/white"/>

        <TextView
                android:id="@+id/calories"
                android:layout_width="match_parent"
                android:layout_height="wrap_content"
                android:layout_marginBottom="10dp"
                android:textAlignment="center"
                android:textAppearance="@style/TextAppearance.MaterialComponents.Subtitle1"
                android:textColor="@color/white"
                android:textSize="18sp"
                tools:text="1500"/>

        <TextView
                android:id="@+id/steps_types"
                android:layout_width="match_parent"
                android:layout_height="wrap_content"
                android:text="@string/steps"
                android:textAlignment="center"
                android:textAppearance="@style/TextAppearance.MaterialComponents.Headline6"
                android:textColor="@color/white"
                android:visibility="gone"/>

        <TextView
                android:id="@+id/steps"
                android:layout_width="match_parent"
                android:layout_height="wrap_content"
                android:layout_marginBottom="10dp"
                android:textAlignment="center"
                android:textAppearance="@style/TextAppearance.MaterialComponents.Subtitle1"
                android:textColor="@color/white"
                android:textSize="18sp"
                android:visibility="gone"
                tools:text="2388"/>

        <TextView
                android:layout_width="match_parent"
                android:layout_height="wrap_content"
                android:text="@string/heart_effort"
                android:textAlignment="center"
                android:textAppearance="@style/TextAppearance.MaterialComponents.Headline6"
                android:textColor="@color/white"/>

        <TextView
                android:id="@+id/effort"
                android:layout_width="match_parent"
                android:layout_height="wrap_content"
                android:layout_marginBottom="10dp"
                android:textAlignment="center"
                android:textAppearance="@style/TextAppearance.MaterialComponents.Subtitle1"
                android:textColor="@color/white"
                android:textSize="18sp"
                tools:text="90%"/>

        <TextView
                android:layout_width="match_parent"
                android:layout_height="wrap_content"
                android:text="@string/battery_level"
                android:textAlignment="center"
                android:textAppearance="@style/TextAppearance.MaterialComponents.Headline6"
                android:textColor="@color/white"/>

        <TextView
                android:id="@+id/battery_level"
                android:layout_width="match_parent"
                android:layout_height="wrap_content"
                android:layout_marginBottom="10dp"
                android:textAlignment="center"
                android:textAppearance="@style/TextAppearance.MaterialComponents.Subtitle1"
                android:textColor="@color/white"
                android:textSize="18sp"
                tools:text="90"/>

        <RelativeLayout
                android:layout_width="match_parent"
                android:layout_height="wrap_content"
                android:layout_marginTop="20dp"
                android:orientation="horizontal">

            <ImageView
                    android:id="@+id/stop"
                    android:layout_width="75dp"
                    android:layout_height="75dp"
                    android:layout_alignParentStart="true"
                    android:layout_centerVertical="true"
                    android:layout_marginStart="25dp"
                    android:contentDescription="@null"
                    android:src="@drawable/ic_stop"
                    android:visibility="gone"
                    app:tint="@color/white"/>

            <ImageView
                    android:id="@+id/pause"
                    android:layout_width="100dp"
                    android:layout_height="100dp"
                    android:layout_centerInParent="true"
                    android:contentDescription="@null"
                    android:src="@drawable/ic_pause"
                    android:visibility="gone"
                    app:tint="@color/white"/>

            <ImageView
                    android:id="@+id/play"
                    android:layout_width="100dp"
                    android:layout_height="100dp"
                    android:layout_centerInParent="true"
                    android:contentDescription="@null"
                    android:src="@drawable/ic_play"
                    app:tint="@color/white"/>
        </RelativeLayout>
    </LinearLayout>
</ScrollView>
The TrainingKeys has constants that will be used to pass parameters from TrainingTypeActivity
to TrainingSoloActivity.
package com.rookmotion.rooktraining.ui.training

object TrainingKeys {
    const val TRAINING_TYPE_SELECTED = "training_type_selected"
}
Finally, make TrainingSoloActivity portrait orientation only.
<activity
        android:name=".ui.training.solo.TrainingSoloActivity"
        android:exported="false"
        android:screenOrientation="portrait"
        tools:ignore="LockedOrientationActivity"/>
- This is required to reduce the tutorial length, the training logic will be implemented in a ViewModel to keep state between configuration changes.
RMTrainer
To use the RMTrainer class you need to extend it and implement the callbacks. It can be extended in an activity or
fragment but in order to maintain the state it will be implemented in a wrapper class TrainerImp which will expose the
state in StateFlows then, that class will be provided to a TrainingSoloViewModel in the next section.
IMPORTANT:
RMTrainerand by extensionTrainerImpcan only do one training if you want to start another training you will need to create anotherTrainerImpinstance.
Got to your.package.name/ui/training and create a TrainerImp class with a Context and an CoroutineScope as
constructor parameters. This class must extend the RMTrainer class.
package com.rookmotion.rooktraining.ui.training

import android.content.Context
import com.rookmotion.app.sdk.persistence.entities.training.HeartRateDerivedData
import com.rookmotion.app.sdk.rmsensor.BluetoothAdapterState
import com.rookmotion.app.sdk.rmsensor.RMBandContact
import com.rookmotion.app.sdk.rmsensor.SensorConnectionState
import com.rookmotion.app.sdk.rmtrainer.RMTrainer
import kotlinx.coroutines.CoroutineScope

class TrainerImp(context: Context, private val scope: CoroutineScope) : RMTrainer(context) {

    override fun onAdapterStateChanged(state: BluetoothAdapterState?) {
        TODO("Not yet implemented")
    }

    override fun onConnectionStateChanged(state: SensorConnectionState?) {
        TODO("Not yet implemented")
    }

    override fun onTimeReceived(sessionSeconds: Float) {
        TODO("Not yet implemented")
    }

    override fun onHrReceived(hrData: HeartRateDerivedData?) {
        TODO("Not yet implemented")
    }

    override fun onHrValidated(isValid: Boolean) {
        TODO("Not yet implemented")
    }

    override fun onStepReceived(currentSteps: Long, cadence: Float) {
        TODO("Not yet implemented")
    }

    override fun onBatteryLevelReceived(level: Int) {
        TODO("Not yet implemented")
    }

    override fun onBandContactReceived(bandContact: RMBandContact?) {
        TODO("Not yet implemented")
    }
}
Create the StateFlows to manage the states.
    private val _adapterState = MutableStateFlow(BluetoothAdapterState.NONE)
val adapterState = _adapterState.asStateFlow()

private val _connectionState = MutableStateFlow<SensorConnectionState>(SensorConnectionState.None)
val connectionState = _connectionState.asStateFlow()

private val _time = MutableStateFlow(0F)
val time = _time.asStateFlow()

private val _heartRate = MutableStateFlow(HeartRateDerivedData())
val heartRate = _heartRate.asStateFlow()

private val _hrValid = MutableStateFlow(true)
val hrValid = _hrValid.asStateFlow()

private val _steps = MutableStateFlow(0L)
val steps = _steps.asStateFlow()

private val _batteryLevel = MutableStateFlow(0)
val batteryLevel = _batteryLevel.asStateFlow()

private val _bandContactState = MutableStateFlow(RMBandContact.UNKNOWN)
val bandContactState = _bandContactState.asStateFlow()
Implement the RMTrainer callbacks
- onAdapterStateChanged - Called every time the bluetooth is turned off/on (or is in the process of doing so).
- onConnectionStateChanged - Called every time the sensor is disconnected, disconnecting, connected, connecting or if the connection attempt failed.
- onTimeReceived - Called every second with the seconds passed since the training started.
- onHrReceived - Called every time a new HR data calculation is done.
- onHrValidated - Called every time the sensor sends HR, you can use it to verify if the HR received is valid ( greater than 0).
- onStepReceived - Called every time a new step calculation is done.
- onBatteryLevelReceived - Called every second with the current connected sensor battery level.
- onBandContactReceived - Called every time the sensor sends HR, you can use it to verify if the band has contact/no contact/contact with measurements/ no contact with measurements , if the current connected sensor is not a band you can ignore these events.
onHrReceived,onHrValidatedandonStepReceivedcallbacks are only called when the training is active (started and not paused).
override fun onAdapterStateChanged(state: BluetoothAdapterState?) {
    scope.launch { state?.let { _adapterState.emit(it) } }
}

override fun onConnectionStateChanged(state: SensorConnectionState?) {
    scope.launch { state?.let { _connectionState.emit(it) } }
}

override fun onTimeReceived(sessionSeconds: Float) {
    scope.launch { _time.emit(sessionSeconds) }
}

override fun onHrReceived(hrData: HeartRateDerivedData?) {
    scope.launch { hrData?.let { _heartRate.emit(it) } }
}

override fun onHrValidated(isValid: Boolean) {
    scope.launch { _hrValid.emit(isValid) }
}

override fun onStepReceived(currentSteps: Long, cadence: Float) {
    scope.launch { _steps.emit(currentSteps) }
}

override fun onBatteryLevelReceived(level: Int) {
    scope.launch { _batteryLevel.emit(level) }
}

override fun onBandContactReceived(bandContact: RMBandContact?) {
    scope.launch { bandContact?.let { _bandContactState.emit(it) } }
}
Finally, create a onDestroyImp function to cancel any pending job, this will be called when the TrainingSoloActivity
is destroyed.
fun onDestroyImp() {
    scope.cancel()
}
Session type
Training sessions are classified in two categories:
- Classic - Only heart rate measurements
- With steps - Heart rate and steps measurements (steps detection are exclusive to RookMotion sensors).
Got to your.package.name/ui/training and create a SessionType sealed class.
package com.rookmotion.rooktraining.ui.training

import com.rookmotion.app.sdk.persistence.entities.training.RMTrainingType
import com.rookmotion.kotlin.sdk.domain.enums.StepsType

sealed class SessionType {
    object Unknown : SessionType()
    class Classic(val trainingType: RMTrainingType) : SessionType()
    class WithSteps(val trainingType: RMTrainingType, val stepsType: StepsType) : SessionType()
}
The available steps types are:
enum class StepsType {
    JUMPS,
    STEPS,
    RUN,
    TRAMPOLINE,
    BOOTS,
    ROPE,
    NONE
}
Using an approach like this will help you to render the correct UI elements.
Coding the ViewModels
This section covers one view model:
- TrainingSoloViewModel - Used in
TrainingSoloActivityto handle all measurements, sensor and training states.
The file structure should look like below:
your.package.name/
    |-- state/
        |-- TrainingSoloViewModel
Create an TrainingSoloViewModel class extending from ViewModel with an TrainerImp as constructor parameter.
package com.rookmotion.rooktraining.state

import androidx.lifecycle.ViewModel
import com.rookmotion.rooktraining.ui.training.TrainerImp

class TrainingSoloViewModel(val trainer: TrainerImp) : ViewModel() {
}
Create a mutable nullable BluetoothPeripheral property, this will hold a reference to the last sensor the user attempted to connect with.
private var connectingWith: BluetoothPeripheral? = null
Create 2 getters isTrainingNotStarted and isTrainingStarted
val isTrainingNotStarted get() = !trainer.isTrainingActive && !trainer.isTrainingPaused
val isTrainingStarted get() = trainer.isTrainingActive || trainer.isTrainingPaused
- To be considered 'started' a training must be active or paused
Create a StateFlow to hold the SessionType state.
private val _sessionType = MutableStateFlow<SessionType>(SessionType.Unknown)
val sessionType = _sessionType.asStateFlow()
Sensor connection
To connect to a sensor call connectSensor or connectSensorWithTimeout they have their own pros and cons. In the
RookMotion App we use connectSensorWithTimeout as it has the fastest connection time. However, you'll need to check if
the sensor is cached.
Independently of the connection function you choose the process is the same:
- Get the
BluetoothPeripheralinstance of the provided mac - Verify that the sensor is not null and is cached (if you use
connectSensorverifiying cache is optional). - Assign sensor to
connectingWith. - Check for a connected sensor if there's one disconnect from it and wait 3 seconds.
- Create the connection request. In the previous tutorial you already linked and saved as last used the sensor, pass false in the second parameter so the SDK won't try to link the sensor again.
- This function will return true if the connection request was created.
fun connect(mac: String): Boolean {
    val sensor = trainer.getPeripheralFromMac(mac)

    return if (sensor != null && !sensor.isUncached) {
        connectingWith = sensor

        viewModelScope.launch {

            if (trainer.connectedSensor != null) {
                trainer.cancelConnection(trainer.connectedSensor)
                delay(3000)
            }

            trainer.connectSensorWithTimeout(sensor, false)
        }

        true
    } else {
        false
    }
}
A description of connectSensor and connectSensorWithTimeout (extracted from the Javadoc).
public final void connectSensor(BluetoothPeripheral sensor, boolean link)

Attempts to connect to a sensor then links the sensor to the user whether the connection attempt was successful or not.
This function will result in longer connection times, but will take of caching.

Considerations:
1. This attempt will not time out. To cancel you'll need to call cancelConnection(BluetoothPeripheral).
2. It is not necessary to scan before calling this function.
3. It is not necessary to make sure the sensor is cached, although you can is still verify with BluetoothPeripheral.isUncached().

Params:
sensor – BluetoothPeripheral instance.
link – Should attempt to link sensor to user? You can pass false if the sensor has already been linked and saved as last used.
public final void connectSensorWithTimeout(BluetoothPeripheral sensor, boolean link)

Attempts to connect to a sensor then links the sensor to the user whether the connection attempt was successful or not.
This function will result in shorter connection times, but you'll need to verify the sensor is cached before connecting.

Considerations:
1. Make sure the device is cached with BluetoothPeripheral.isUncached(), if cached connect.
2. If the device is un-cached you must scan with startDiscovery(long), then repeat step 1.
3. This attempt will time out in 30 seconds on most devices (5 seconds for samsung devices).

Params:
sensor – BluetoothPeripheral instance.
link – Should attempt to link sensor to user? You can pass false if the sensor has already been linked and saved as last used.
To disconnect from a sensor call cancelConnection and provide a sensor (this can also cancel a connection request)
or finishSensorConnection to disconnect from current connected sensor. We recommend using cancelConnection as it
offers more flexibility.
fun cancelConnection() {
    if (connectingWith != null) {
        trainer.cancelConnection(connectingWith)
    }
}
connectingWithknows which sensor the last connection request was made to. Later you'll use it to cancel a connection request.
Set training type
To set a training type to the training session call setTrainingType it will return the StepsType of the session.
Then use it to emit the current training session's SessionType.
fun initTrainingType(trainingType: RMTrainingType) {
    val stepsType = trainer.setTrainingType(trainingType)

    if (stepsType != StepsType.NONE) {
        trainer.enableStepsReading(true)
        _sessionType.tryEmit(SessionType.WithSteps(trainingType, stepsType))
    } else {
        trainer.enableStepsReading(false)
        _sessionType.tryEmit(SessionType.Classic(trainingType))
    }
}

fun getStepsType(): StepsType {
    return if (_sessionType.value is SessionType.WithSteps) {
        (_sessionType.value as SessionType.WithSteps).stepsType
    } else {
        StepsType.NONE
    }
}
- If the
StepsTypeis not NONE you MUST callenableStepsReadingso this training session ca obtain steps data from the sensor (RookMotion sensors only). - You MUST set the training type before starting the training
Training controls
Start training:
fun startTraining() {
    trainer.startTraining()
}
startTrainingcan only be called once.
Pause / Resume training:
fun pauseTraining() {
    trainer.pauseTraining()
}

fun resumeTraining() {
    trainer.resumeTraining()
}
Before canceling a training you should disconnect the sensor, once cancelTraining is called all training, summaries
and records are deleted FOREVER.
fun cancelTraining() {
    cancelConnection()
    trainer.cancelTraining()
}
Before finishing a training you should disconnect the sensor, this function will return the timestamp at which the training started, this will be used in the next tutorial to show a summary screen.art
fun finishTraining(): String {
    cancelConnection()
    trainer.finishAndUploadTraining() { rmResponse, result ->
        if (rmResponse.isSuccess) {
            Timber.i("Training uploaded summaries and uuid: ${result.trainingUUID} are available")
        } else {
            Timber.i("Training not uploaded only summaries are available")
        }
    }

    return trainer.startTime
}
- You can call
finishTrainingif you don't want to upload the training. You can upload later callinguploadPendingTrainingson theRMclass.
Releasing resources
Call this function when TrainingSoloActivity is being destroyed, to release bluetooth resources, and cancel any
pending jobs.
fun releaseTrainingResources() {
    cancelConnection()
    trainer.pauseTraining()
    trainer.onDestroyImp()
    trainer.onDestroy()
}
- Don't worry about the call to
pauseTrainingit won't do anything an already canceled or finished training, it is called to cover the case when the app crashes for any error, if that happens the training will be paused will be available to be continued (Continuing pending trainings will be explored in another tutorial).
Factory
Finally, add the view models to the RMApplicationViewModelFactory's create function.
override fun <T : ViewModel> create(modelClass: Class<T>): T {

    // Other conditions

    if (modelClass.isAssignableFrom(TrainingSoloViewModel::class.java)) {
        return TrainingSoloViewModel(
            trainer = TrainerImp(
                context = application.applicationContext,
                scope = CoroutineScope(SupervisorJob() + Dispatchers.Default)
            )
        ) as T
    }

    throw IllegalArgumentException("Unknown ViewModel class")
}
Integrating ViewModel and UI
TrainingTypeActivity
In the goToTraining function add a call to startActivity providing the selected training type, TrainingTypeMapper
will convert the training type to a json string.
private fun goToTraining(trainingType: RMTrainingType) {
    val intent = Intent(this, TrainingSoloActivity::class.java).apply {
        putExtra(TrainingKeys.TRAINING_TYPE_SELECTED, TrainingTypeMapper.toJson(trainingType))
    }

    startActivity(intent)
}
TrainingSoloViewModel
Create an TrainingSoloViewModel instance and an ActivityResultLauncher instance this will be used to launch and
retrieve the result of SensorScannerActivity.
class TrainingSoloViewModel : AppCompatActivity() {

    private lateinit var sensorsLauncher: ActivityResultLauncher<Intent>

    private val trainingSoloViewModel by viewModels<TrainingSoloViewModel> {
        RMApplicationViewModelFactory(application as RookTrainingApplication)
    }
}
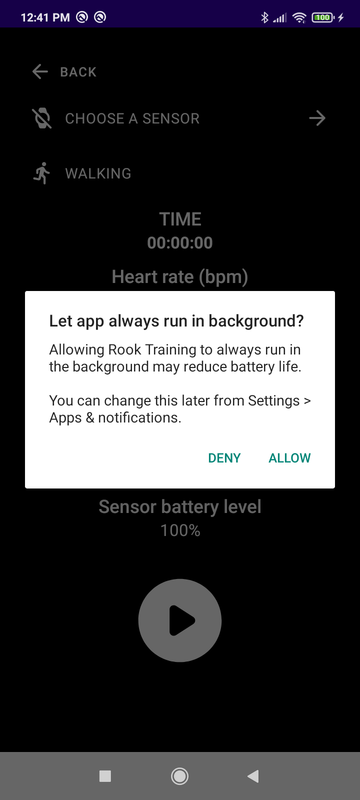
Some phones will kill the app when is on background or if the screen is blocked, due to energy limitations, to avoid this you should ask the user to disable battery optimizations.
This can be done using our BatteryManager which works the same as PermissionsManager.
private val batteryManager = BatteryManager()

override fun onCreate(savedInstanceState: Bundle?) {
    super.onCreate(savedInstanceState)
    binding = ActivityTrainingSoloBinding.inflate(layoutInflater)
    setContentView(binding.root)

    batteryManager.registerIgnoreOptimizationsListener(
        componentActivity = this,
        onSuccess = { toastShort(getString(R.string.thanks)) },
        onFailure = { Timber.w("User rejected disabling battery optimizations") }
    )

    if (!batteryManager.isIgnoringBatteryOptimizations(this)) {
        batteryManager.requestIgnoreOptimizations(packageName)
    }
}
BatteryManageris available on our sdk-utils library.
Override onDestroy to release resources when the activity is destroyed.
override fun onDestroy() {
    if (!isChangingConfigurations) {
        batteryManager.onDestroy()
        trainingSoloViewModel.releaseTrainingResources()
    }

    super.onDestroy()
}
Override onBackPressed to show an stop training dialog if there is an active training session.
override fun onBackPressed() {
    if (trainingSoloViewModel.isTrainingStarted) {
        showStopTrainingDialog()
    } else {
        super.onBackPressed()
    }
}
Add the init functions calls to onCreate
    override fun onCreate(savedInstanceState: Bundle?) {
    super.onCreate(savedInstanceState)
    binding = ActivityTrainingSoloBinding.inflate(layoutInflater)
    setContentView(binding.root)

    batteryManager.registerIgnoreOptimizationsListener(
        componentActivity = this,
        onSuccess = { toastShort(getString(R.string.thanks)) },
        onFailure = { Timber.w("User rejected disabling battery optimizations") }
    )

    if (!batteryManager.isIgnoringBatteryOptimizations(this)) {
        batteryManager.requestIgnoreOptimizations(packageName)
    }

    initExtras()
    initSensorConnectionListeners()
    initTrainingListeners()
    initActions()
}
Create the initExtras function to get the selected training type.
It's very important to check for isTrainingNotStarted to avoid calling the init logic once the user is training.
private fun initExtras() {
    val trainingTypeJson = intent.extras?.getString(TrainingKeys.TRAINING_TYPE_SELECTED) ?: ""

    if (trainingSoloViewModel.isTrainingNotStarted) {
        val trainingType = TrainingTypeMapper.fromJson(trainingTypeJson)

        if (trainingType != null) {
            trainingSoloViewModel.initTrainingType(trainingType)
        }
    } else {
        Timber.i("initExtras: training is active, skipped")
    }
}
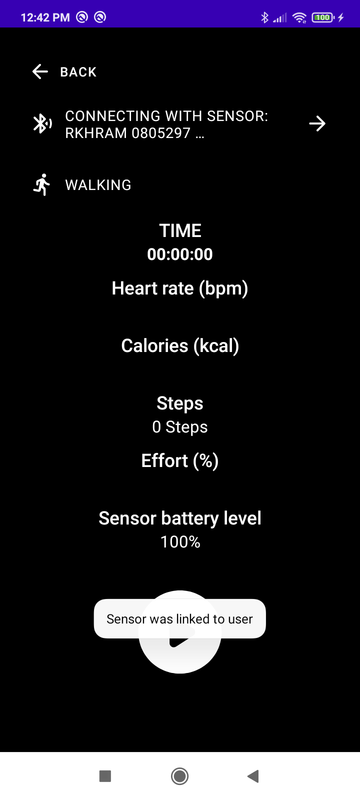
Create the initSensorConnectionListeners function to consume the connectionState StateFlow
private fun initSensorConnectionListeners() {
    lifecycleScope.launchWhenResumed {
        trainingSoloViewModel.trainer.connectionState.collect {
            when (it) {
                is SensorConnectionState.Connecting -> {
                    val label = getString(
                        R.string.connecting_with_sensor,
                        it.sensor.name ?: getString(R.string.unknown_sensor)
                    )

                    binding.sensorState.setImageResource(R.drawable.ic_bluetooth_connecting)
                    binding.sensorName.text = label
                }
                is SensorConnectionState.ConnectionFailed -> {
                    binding.sensorState.setImageResource(R.drawable.ic_sensor_off)
                    binding.sensorName.setText(R.string.could_not_connect)
                }
                is SensorConnectionState.Connected -> {
                    binding.sensorState.setImageResource(R.drawable.ic_sensor)
                    binding.sensorName.text =
                        it.sensor.name ?: getString(R.string.unknown_sensor)
                }
                is SensorConnectionState.Disconnecting -> {
                    Timber.i("Disconnecting from sensor ${it.sensor.name}")
                }
                is SensorConnectionState.Disconnected -> {
                    binding.sensorState.setImageResource(R.drawable.ic_sensor_off)
                    binding.sensorName.setText(R.string.sensor_connection_lost)
                }
                SensorConnectionState.None -> Timber.i("SensorConnectionState.None")
            }
        }
    }
}
Then initialize the sensorsLauncher. When the user selects a sensor on the SensorScannerActivity it will return the
selected sensor's mac, and you will be able to call the connect function.
private fun initSensorConnectionListeners() {

    // Consume connectionState

    sensorsLauncher = registerForActivityResult(
        ActivityResultContracts.StartActivityForResult()
    ) {
        if (it.resultCode == RESULT_OK && it.data != null) {

            val mac = it.data?.getStringExtra(ScannerKeys.SENSOR_SELECTED)?.uppercase() ?: ""
            val success = trainingSoloViewModel.connect(mac)

            if (success) {
                Timber.i("Connection request created successfully")
            } else {
                Timber.i("Connection request not created")
            }
        }
    }
}
Create the initTrainingListeners to consume the sessionType, time, heartRate,hrValid,steps,batteryLevel
and bandContactState states.
private fun initTrainingListeners() {
    lifecycleScope.launchWhenResumed {
        trainingSoloViewModel.sessionType.collect {
            when (it) {
                SessionType.Unknown -> Timber.i("sessionType: None")
                is SessionType.Classic -> {
                    binding.trainingTypeIcon.setImageResource(R.drawable.ic_training_type)
                    binding.trainingType.text = it.trainingType.trainingName
                    binding.stepsTypes.isVisible = false
                    binding.steps.isVisible = false
                }
                is SessionType.WithSteps -> {
                    binding.trainingTypeIcon.setImageResource(R.drawable.ic_training_type_steps)
                    binding.trainingType.text = it.trainingType.trainingName
                    binding.stepsTypes.isVisible = true
                    binding.steps.isVisible = true
                }
            }
        }
    }

    lifecycleScope.launchWhenResumed {
        trainingSoloViewModel.trainer.time.collect {
            binding.duration.text = TimeFormatter.formatSecondsToHHMMSS(it)
        }
    }

    lifecycleScope.launchWhenResumed {
        trainingSoloViewModel.trainer.heartRate.collect {
            if (it.calories > 0F) {
                manageHeartRateData(it)
            }
        }
    }

    lifecycleScope.launchWhenResumed {
        trainingSoloViewModel.trainer.hrValid.collect {
            Timber.i("Heart rate is grater than zero? $it")
        }
    }

    lifecycleScope.launchWhenResumed {
        trainingSoloViewModel.trainer.steps.collect {
            val label = AppResources.suffixOfStepsType(
                context = this@TrainingSoloActivity,
                stepsType = trainingSoloViewModel.getStepsType()
            )

            binding.steps.text = "$it $label"
        }
    }

    lifecycleScope.launchWhenResumed {
        trainingSoloViewModel.trainer.batteryLevel.collect {
            binding.batteryLevel.text = "$it%"
        }
    }

    lifecycleScope.launchWhenResumed {
        trainingSoloViewModel.trainer.bandContactState.collect {
            Timber.i("Band contact: ${it.name}")
        }
    }
}
The TimeUtils object is available in our sdk-utils library.
For the suffixOfStepsType function go to your.package.name/AppResources and paste the following:
package com.rookmotion.rooktraining.utils

import android.content.Context
import com.rookmotion.kotlin.sdk.domain.enums.StepsType

object AppResources {

    fun suffixOfStepsType(context: Context, stepsType: StepsType): String {
        return when (stepsType) {
            StepsType.TRAMPOLINE, StepsType.BOOTS, StepsType.JUMPS -> context.getString(R.string.jumps)
            StepsType.STEPS, StepsType.RUN, StepsType.ROPE -> context.getString(R.string.steps)
            StepsType.NONE -> ""
        }
    }
}
There are 5 effort zones each one represented by a color
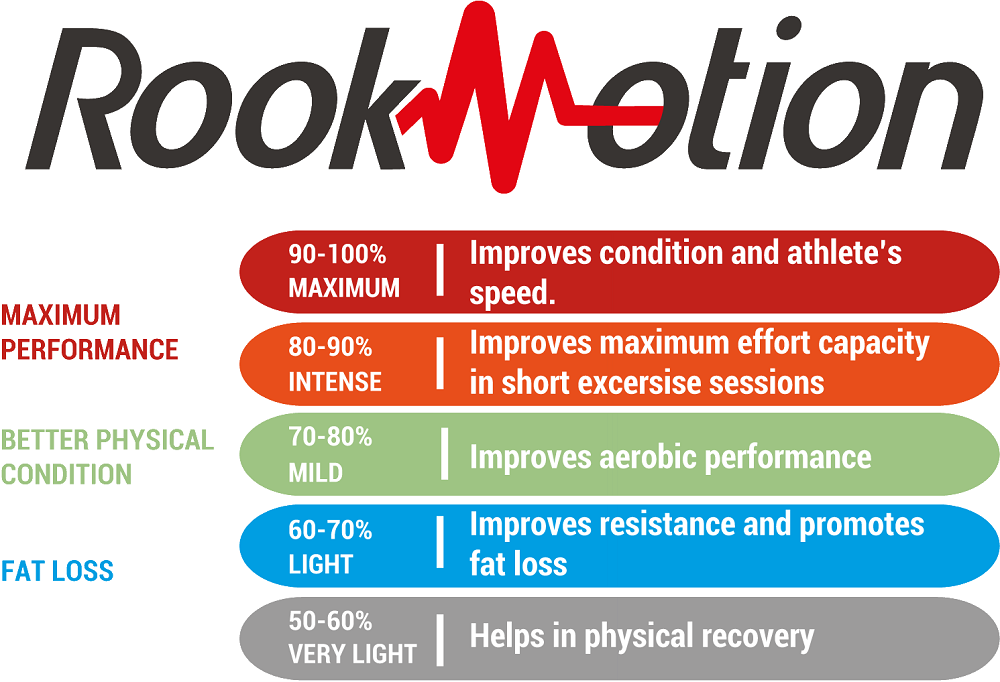
Using this information you can paint the background and status bar based on the HeartRateDerivedData effort value.
private fun manageHeartRateData(data: HeartRateDerivedData) {

    val effort = data.effort.roundToInt()

    binding.heartRate.text = "${data.heartRate.roundToInt()}"
    binding.calories.text = "${data.calories.roundToInt()}"
    binding.effort.text = "$effort"

    when {
        effort >= 90 -> {
            setStatusBarColor(R.color.zone_5)
            binding.base.setBackgroundColor(ContextCompat.getColor(this, R.color.zone_5))
        }
        effort >= 80 -> {
            setStatusBarColor(R.color.zone_4)
            binding.base.setBackgroundColor(ContextCompat.getColor(this, R.color.zone_4))
        }
        effort >= 70 -> {
            setStatusBarColor(R.color.zone_3)
            binding.base.setBackgroundColor(ContextCompat.getColor(this, R.color.zone_3))
        }
        effort >= 60 -> {
            setStatusBarColor(R.color.zone_2)
            binding.base.setBackgroundColor(ContextCompat.getColor(this, R.color.zone_2))
        }
        effort >= 50 -> {
            setStatusBarColor(R.color.zone_1)
            binding.base.setBackgroundColor(ContextCompat.getColor(this, R.color.zone_1))
        }
        else -> {
            setStatusBarColor(R.color.zone_0)
            binding.base.setBackgroundColor(ContextCompat.getColor(this, R.color.zone_0))
        }
    }
}
Go to your.package.name/utils/RMExtensions and create an extension function to update the status bar color.
fun Activity.setStatusBarColor(colorResourceId: Int) {
    window?.statusBarColor = ContextCompat.getColor(this, colorResourceId)
}
Create the initActions function to add the back and chooseSensor click listeners.
private fun initActions() {
    binding.back.setOnClickListener { onBackPressed() }

    binding.chooseSensor.setOnClickListener { goToSelectSensor() }
}
- The play button will call
resumeTrainingwhen the training is paused otherwisestartTraining. - The pause button will call
resumeTraining. - The pause button will show a stop training dialog.
private fun initActions() {

    // Other buttons

    binding.play.setOnClickListener {
        if (trainingSoloViewModel.trainer.isTrainingPaused) {
            trainingSoloViewModel.resumeTraining()
        } else {
            trainingSoloViewModel.startTraining()
        }

        binding.play.isVisible = false
        binding.pause.isVisible = true
        binding.stop.isVisible = true
    }

    binding.pause.setOnClickListener {
        trainingSoloViewModel.pauseTraining()

        binding.play.isVisible = true
        binding.pause.isVisible = false
    }

    binding.stop.setOnClickListener { showStopTrainingDialog() }

    updateControlButtons()
}
updateControlButtons will update the controls state if the activity is recreated.
private fun updateControlButtons() {
    if (trainingSoloViewModel.trainer.isTrainingActive) {
        binding.play.isVisible = false
        binding.pause.isVisible = true
    } else {
        binding.play.isVisible = true
        binding.pause.isVisible = false
    }

    if (trainingSoloViewModel.isTrainingStarted) {
        binding.stop.isVisible = true
    }
}
Implement the goToSelectSensor function to:
- Obtain the current connected sensor with
getConnectedSensor - Check the current
connectionStateif it's connecting cancel the connection (to avoid problems where some devices can't connect and scan at the same time) - Launch the
SensorScannerActivityproviding the connected sensor mac and name.
private fun goToSelectSensor() {
    val connected: BluetoothPeripheral? = trainingSoloViewModel.trainer.connectedSensor

    if (trainingSoloViewModel.trainer.connectionState.value is SensorConnectionState.Connecting) {
        trainingSoloViewModel.cancelConnection()
    }

    sensorsLauncher.launch(
        Intent(this, SensorScannerActivity::class.java).apply {
            putExtra(ScannerKeys.SENSOR_CONNECTED_MAC, connected?.address)
            putExtra(ScannerKeys.SENSOR_CONNECTED_NAME, connected?.name)
        }
    )
}
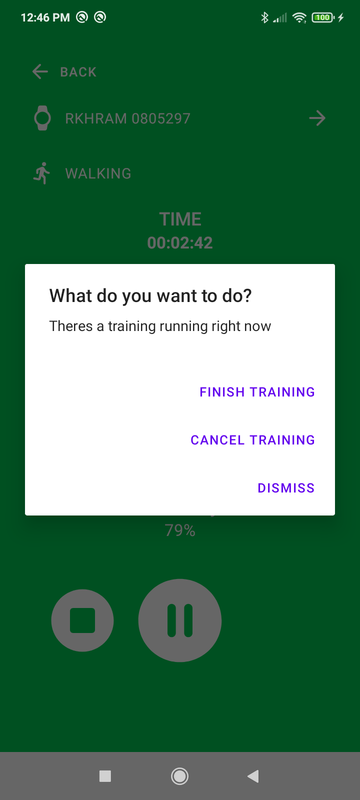
showStopTrainingDialog will display an alert dialog with 3 options:
- Finish training - Call to
finishTraining - Cancel training - Call to
trainingSoloViewModel.cancelTrainingthen finish the activity. - Dismiss - Hides dialog.
private fun showStopTrainingDialog() {
    Dialogs.showStopTrainingDialog(
        this,
        cancelTraining = {
            trainingSoloViewModel.cancelTraining()
            finish()
        },
        finishTraining = { finishTraining() }
    )
}
Alert dialog code in your.package.name/utils/Dialogs:
package com.rookmotion.rooktraining.utils

import android.content.Context
import androidx.appcompat.app.AlertDialog
import com.rookmotion.rooktraining.R

object Dialogs {
    fun showStopTrainingDialog(
        context: Context,
        cancelTraining: () -> Unit,
        finishTraining: () -> Unit
    ) {
        AlertDialog.Builder(context)
            .setTitle(R.string.what_do_you_want_to_do)
            .setMessage(R.string.theres_a_training_running)
            .setNeutralButton(R.string.dismiss) { dialog, _ ->
                dialog.dismiss()
            }
            .setNegativeButton(R.string.cancel_training) { dialog, _ ->
                dialog.dismiss()
                cancelTraining()
            }
            .setPositiveButton(R.string.finish_training) { dialog, _ ->
                dialog.dismiss()
                finishTraining()
            }
            .show()
    }
}
Finally, implement the finishTraining function to:
- Call
trainingSoloViewModel.finishTraining - Get the current training and steps type (will be used in next tutorial to show a summary screen).
- Finish the activity.
private fun finishTraining() {
    val startTime = trainingSoloViewModel.finishTraining()
    val trainingType = trainingSoloViewModel.trainer.trainingType
    val stepsType = trainingSoloViewModel.getStepsType()

    finish()
}
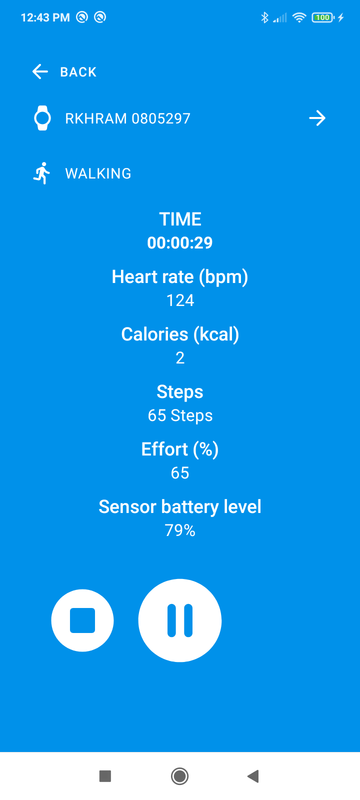
Running the app
Wrapping up
At the end of this tutorial your app should be able to:
Select a training type and navigate to the training screen.
Go to the scanner screen, select a sensor and connect to it.
Start / Pause / Resume / Cancel and Finish the training
When finishing TrainingSoloActivity you should see a log like:
I/BluetoothPeripheral: force disconnect 'RkHRam 0805297' (FB:6B:F4:5C:4E:4E)
I/BluetoothPeripheral: disconnected 'RkHRam 0805297' on request
Indicating that the sensor was disconnected.
If you finish the training you'll see the log in TrainingSoloViewModel's uploadTraining function indicating if the
upload was successful:
I/TrainingSoloViewModel: Training uploaded summaries and uuid: 192ae100-83a2-4ae3-9817-b39ab1f22983 are available
If you cancel the training you should see a log like:
I/RMTrainer: Summaries deleted
I/RMTrainer: Heart Rate deleted
I/RMTrainer: Training canceled
Next steps
Congratulations! You successfully created an individual training, go to the next tutorial to learn how to Show summaries of a finished training.